🚀 Getting started with catalog and labels
This page explains the general principle behind the Digital Test Center catalog and how QR codes are used in the physical world.
The goal is simple: connect the products registered in Backoffice with the real physical products handled during tests.
What is this process for?
In Digital Test Center, tests are linked to physical units that must be identified clearly and consistently.
The catalog therefore structures your data at two levels:
- the
model, which represents the general product reference; - the
item, which represents one specific physical unit of that product.
Each item can then be identified in the field with a unique code, printed and attached to the corresponding product.
Two complementary diagrams
To discover the solution more easily, we recommend reading the two diagrams in this order:
- The process diagram below, which explains the overall cycle of label ordering, assignment, and usage.
- The catalog overview, which explains how the data is organized in Backoffice.
In other words:
- this first diagram shows
how a physical product gets an identity in the system; - the second diagram shows
where that identity fits in the catalog structure.
How to work with Digital Test Center labels
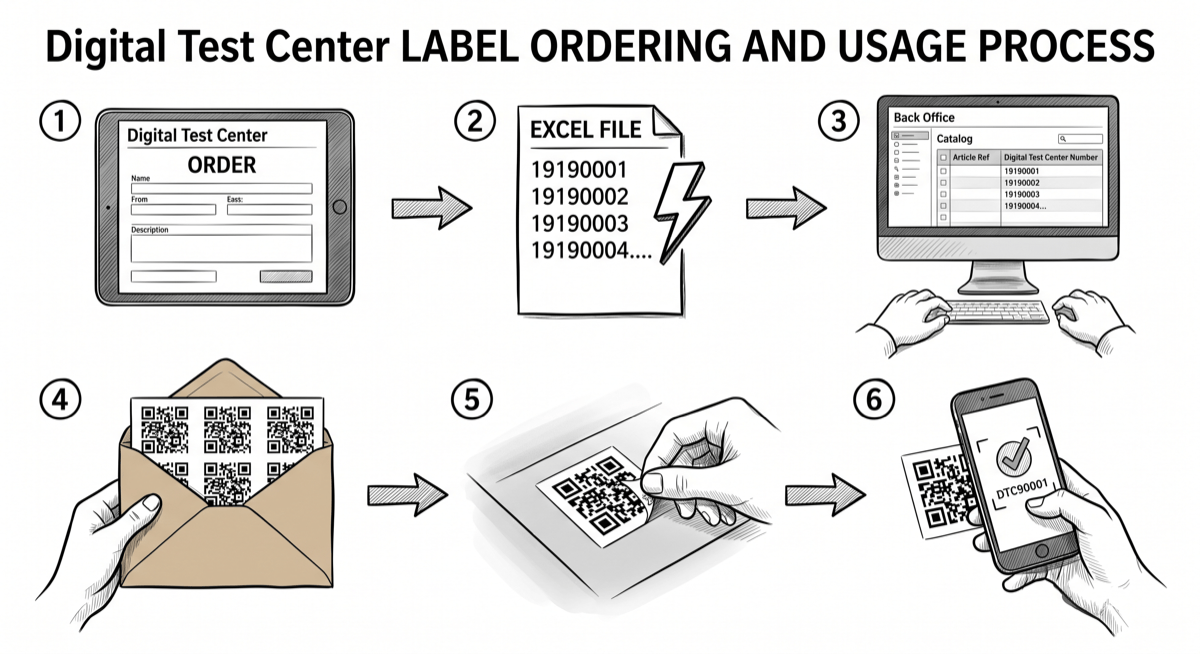
1. Label ordering
I order the required number of labels in Digital Test Center. This step defines how many physical products will need to be identified in the field. You can place the order using the barcode order form.
2. Unique code list generation
I immediately receive an Excel file with the numbers. These numbers are the unique identifiers that will later be linked to my physical products.
3. Registration in Backoffice
I enter these numbers in my catalog or items. At this stage, Backoffice becomes the reference point between:
- the product data;
- the physical item;
- the code printed on the label.
4. Label delivery
I receive the labels by post or in person. I can now prepare the physical products for identification.
5. Applying labels to products
I stick each label on the right product. Each physical item now has its own identity in Digital Test Center.
6. Scanning and field tracking
My products can then be scanned and tracked in the field. This makes testing, follow-up, and traceability much easier.
How should you understand the key concepts?
🧩 Model
The model is the generic product reference. For example: a type of headset, beverage, vehicle, or device.
🏷️ Item
The item is one concrete physical unit of that model. This is the level that receives a unique label.
🔎 Unique code
The printed code on the label identifies that exact item in Digital Test Center. It prevents confusion between multiple units of the same product.
Why does it matter?
This workflow makes it possible to:
- connect the digital system with the physical world;
- know exactly which product was used during a test;
- ensure campaign traceability;
- simplify scanning and mobile operations.
Where should you start in Backoffice?
If you are new to the solution, we recommend this order:
- Understand the catalog structure.
- Create or organize your brands.
- Create your models.
- Import or create your items.
- Associate the codes and use identified products in testing operations.
Good to know
This page explains the overall principle. The following pages then cover the concrete steps in the interface.